Sunday, December 18, 2016

Red stone hardwood sawdust bricks Review

Red stone brand hardwood sawdust bricks in six pack.


Purchased these sawdust bricks at my local feed store. They cost around $3.50 for a pack of 6.

First let me start with the positives.
They are a recycled wood product.
They light very easily.
They are a convenient space saving shape and stacks easily.

Let's look at the package claims.

"Eco friendly bricks burn longer than cord wood" - NOT in my stove

"Produces less than 1/2 percent ash content" - not sure what that means but the ash produced was no less than a comparable weight of my cord wood. My cord wood produced a lighter colored, fluffier ash.

"Takes less than half the storage space of cord wood." - Well... Per weight, maybe. But my cord wood burned a whole lot more efficiently than this product and I'm thinking you may have to buy a whole lot more of these bricks to make up for it. Also... You can't store these bricks outside.

Now for the things I don't like about these bricks.
They are messy. Just as messy as regular cord hardwood. There are sawdust and wood shavings all over the place.
They come wrapped in plastic. Which for me, negates a little from the recycled reusable benefit of these bricks.
They burn very quickly. It took only 2 hours for 1 brick to go from lit to coal.
The coal that these bricks leave behind is very dusty and crumbly.
The price seems minimal but when you take into account how quickly they burn and compare the price to that of cordwood or my favorite extruded logs, they are extremely expensive.

In summary, I will not be buying these bricks again nor can I recommend them for someone has a fuel efficient wood-burning stove and wants and consistent or longer burn. My cord wood is a far better burn and value than these hardwood sawdust bricks. These bricks might be good if you could crumble them and use them for fire starter instead of an alternative to cord wood burning.

This review was of my own honest, personal opinion and experience and was not endorsed in any way by any company the product was purchased personally out of curiosity.


Tuesday, November 12, 2013

Classic Beef Stew in Dutch Oven

Wood-stove Dutch oven Classic Beef Stew

Be sure your food is cooked to optimal food safety temperatures before consuming. Always use proper cooking utensils and kitchen safety accessories.

Time

This dish needs at least 1 hour of prep time before you can leave it to slow-cook.
I like to slow-cook this dish for at least 6 hours.


Yield : 4 quarts (about 6 servings)


Equipment  

4.5 quart Dutch Oven
Stirring spoon
Soup ladle for serving


Ingredients

1.5 lbs Beef for stew
          - You can use just about any cut since this is stew it will cook a long time and get tender. Some even use ground meat. I am using pre-cut "stew beef" from my grocer. This is usually the leftover trimmings from more expensive cuts and it is cut to chunks of about 1 -2 inches.

1 lb. carrot
 - cut into about 1-2 inch lengths. You could also use "baby" carrots

1 lb. red potato
 - cut into about 1- 2 inch chunks. You can also use fingerling or yellow potato. Just try to stay away from russet as they can just "melt" into a mush with a long cooking process.

10 oz - 1 lb onion
 - cut into 1 inch chunks. I used a combo of sweet yellow and red onion this time. Pearl onions or shallots would also work but will give a milder onion flavor.

Beef stock or broth about 3 cups or 26 oz

2 -3 tbsp flour - depending on how thick you like your stew

1 bay leaf


Optional ingredients to your taste:

Salt  - to taste
Pepper - to taste
2 garlic cloves (I added this)
Celery - not in mine since hubby has a strong aversion to this ingredient
Other types of veggies like green beans or corn.
Diced tomatoes


Method

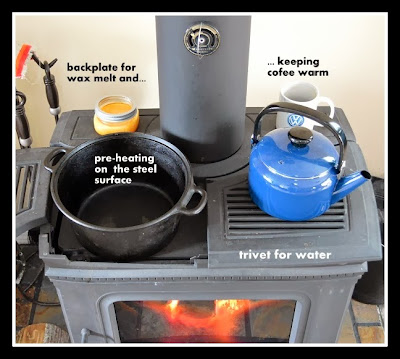
I like to preheat my cast iron dutch oven on the hot plate of my stove after the stove has come to optimal temperature (a drop of water in the pot will quickly sizzle).


When the dutch oven is nice and hot. I will place the beef in the pot and get it cooked brown on the outside and cooked to about medium.
Sprinkle the flour evenly over the stew meat and stir in.


Add the veggies, bay leaf and broth. Give it a little stir to incorporate ingredients and to be sure the flour does not clump or get stuck on the bottom.

Cover and let cook for at least 6 hours, stirring occasionally. I kept mine on the hot plate of the stove with the stove on low. My stove thermometer read about 400 degrees F for surface temperature. If I were cooking on a colder day, I might have used the trivet depending on how hot the stew were to get. I don't want a boiling stew but an occasional simmer would be OK. 


I like to check and adjust about an hour before serving. This way I can adjust the seasoning, check the thickness and make adjustments to the fire, leave the lid off the pot or add things. If your stew is too thin for you, you can smoosh up some of those potato chunks or make a roux. If too thick, a little water will not hurt.

Don't forget to remove that bay leaf - it's not edible.

I like to serve beef stew with a warm, hearty artisan bread like whole grain farmhouse bread or a crusty on the outside, chewy on the inside roll. A dollop of butter in the stew does not taste bad either.


Monday, November 11, 2013

Tip 2. Patience and Presence

Tip number 2 for wood-stove cooking is...

...have patience and presence.

Patience is a must. Using a wood-stove to cook is generally a slower process compared to our electric or gas appliances. Because of it's organic nature, wood-stove cooking takes more of an artisan approach and things will not cook the same exact way each time.

This also requires presence. I love the convenience of sticking something in an electric programmable slow-cooker and leaving for the day or not having to check on it till the buzzer goes off. Not the case with wood-stoves.
You must not leave your food items unattended like you would with an electric slow-cooker.

With slow-cook dishes, I have left to run an errand for a couple hours and returned and all was fine. I made sure the stove had gone through its' start up phase and had plenty of fuel and was turned to low. But, it is always at your own risk. The fire could die out or flare up. This can put your food at risk of burning or falling below safe cooking temperature.

I like to be able to check the fire and food at least every hour and make adjustments as necessary.

Clutch your mug of hot tea, enjoy the warmth and glow of your wood-stove fire and inhale the intoxicating aroma of your meal as it cooks.

Always use your stove safely and according to the manufacturers instructions!!!

Sunday, November 10, 2013

Tip 1. Know Your Stove

My first tip for wood-stove cooking is...

... Get to know your stove.

Hopefully, we start with reading our owners manual, or learn from someone experienced before we use our other cooking appliances. 

We need to do the same with a wood-stove. Start with the owners manual and learn how the manufacturer designed it to be used most efficiently and safely. I have found that the manufacturer of my stove has some great online videos that have proven to be very helpful to get the most out of my stove.

We also don't want to use broken or incorrectly installed equipment. Be sure your stove is cleaned and inspected regularly by certified professionals.

Each stove is different and so is the environment. If you have used wood stove heating, you will know that each day's weather is different and your wood may differ drastically. These things affect the way your stove heats which means cooking will be different every time. The temperatures will fluctuate and the areas of heat will change.

The best way to start learning to cook using your wood-stove is to first, learn your wood-stove. 

Saturday, November 9, 2013

Welcome!

Welcome to Rock Shed Recipes, a "sister" blog to MossyTrees.blogspot.com.

I was inspired to start this blog for several reasons. For one thing, my recipe collection was getting too big for MossyTrees and I wanted to add my wood-stove recipes. After we made the switch from electric to wood-stove heat, I wanted to utilize my stove for cooking whenever possible.
Frustrated that I could not find a great site for recipes or advice for the modern wood-stove cook, I thought "Why not start one myself?" So, I did.

This site will feature wood-stove cooking advice, reviews and recipes as well as other conventional recipes developed and tested by me.

I hope is that this can be a fun place for useful tips and advice, a sharing of ideas, reviews and most of all, great food.


We all know that cooking takes time. So does writing. It takes even more time to cook using a wood-stove, review and revise recipes and write and edit for publishing. This blog will contain advertisements in the sidebars that I may or may not personally endorse. With the exception of  "PoultryPlayground" shops on Zazzle and Etsy - I fully endorse that shop as it is my own.
I do welcome commercial product donations in exchange for my honest opinions in reviews and use in the photos and product names in the posts in which the products are used. I believe in honesty and full disclosure and I will always state if something was solicited. My reviews and opinions will always be true and honest and my own.